Showing posts with label DIY. Show all posts

Thursday, June 13, 2013

Plan: Redecorate The Guest Bathroom

We bought our house eleven years ago this past May.  When we moved in, I had already bought all of the accessories for our new guest bath.  We went with a tropical, palm tree motif.  Three years later, we finally painted the walls a neutral beige color.  Since those days, we have added a child. I thought it was about time to change out the decor and make it more kid friendly.

We are fans of all things beachy, pink, and Pottery Barn Kids.  I was browsing in the store a couple of months ago and came across their Mermaid Shower Curtain:


I also purchased the matching hand and bath towels and bath rug:


I replaced two palm tree prints with this mermaid plaque I found on sale at PB Kids:


We have yet to pick out a new wall paint color.  I haven't decided whether to choose a very light pink or go with a white wall and paint the oak vanity a fun light aqua color.  I also found a big piece of faux coral from Kirland's that I would like to paint a different color.  Stay tuned for photos of what I DIY'd for this bathroom.


Wednesday, February 27, 2013

DIY Pet Pillow: Chihuahua

It is that time again!!!


Link up your Pinterest projects with Sherry, Katie, Megan, and Michelle!

I have been wanting to make a Chihuahua shaped pillow of my mom's dog, Buster, as a gift.  

Materials needed:

1) A good quality photo of the pet/animal you'd like to use
2) Iron on transfer paper
3) Ink Jet printer
4) Sewing machine (or you could sew by hand)
5) needle and thread
6) material
7) Iron and some type of heat resistant hard backing (wood cutting board/piece of wood)
8) Poly fill

Step 1:
Prepare your image.  I used Photo Shop to add Buster to a white background and clean up the edges of his outline.  Then, I sized the image to best fit my transfer paper.  You may have to create a mirror image of your image but in my case, it won't matter which way he prints onto the paper.

Step 2:
Make sure you have enough ink in your printer.  You may want to print out a test print in order to make sure your image will fit the page the way you want it to.  Once you are good to go, add your transfer paper to the printer so that your image will print onto the unmarked side of the transfer sheet.  The ink must dry for 30 minutes before you can transfer it.  Now you may trim the image to your desired shape.


Step 3:
Iron your fabric smooth if need be.  Preheat your iron for 5 minutes to the highest cotton setting.  Do not use steam!  You will need to put your fabric over the heat resistant hard backing such as a wood cutting board.  You can't use an ironing board for this step.  Place your image face down onto your fabric where you want it to be.  Iron over the entire image using a circular motion making sure entire transfer, especially the edges, receives 15 to 20 seconds of heat.  Now, you may remove the transfer paper's backing.


Step 4: 
Trim your fabric to your desired pillow size.  Put the fabric with right sides facing in and sew around the edges, leaving a section a few inches wide open.  Now turn your pillow right side out and stuff with poly fill.  Finish by hand sewing the remaining opening.  Now you are finished!


Original inspiration pin came from go make me:


Tuesday, July 10, 2012

Creative Summer Update/Pinterest Challenge


I have been interested in learning how to do embroidery by hand.  I have been inspired by several images on Pinterest.  Some as simple as embroidering of a road trip on a map to as ornate as beautiful flowers:
Sources:
1.  Map

Then I found this Seahorse pattern from Kim's Etsy shop, bigBgsd:

                                                  Source: bigbgsd.blogspot.com via Monica @ Creative Gator on Pinterest

Since I have a love for all things of the sea, I decided to try to use this PDF pattern as my first attempt at embroidery.  I used Kim's blog to figure out the scroll stitch as the border.  My stitching is not anywhere near perfect but it was fun to try.  As for the rest of the pattern, I just winged it.


I'm still trying to decide if I will rip out the scroll stitch along the top left and try it again.  Overall, it was a lot of fun and I look forward to learning new stitches. I plan to eventually frame it and hang it in my daughter's room on her gallery wall. I'm linking up with the Summer Pinterest Challenge hosted by Katie, Sherry, Kate, and Michelle.


Friday, June 1, 2012

A Creative Summer

Well, the first week of my daughter's summer vacation has drawn to a close.  It began with a very busy weekend full of dance recital rehearsal, actual recital, family and friends visiting, the beach/pool time, and lots of eating.  Since Memorial Day, we have just hung out and enjoyed a relaxed pace.  No specific time to wake up, no where to go, and no obligations.  I have to admit it was perfect.  But now I am looking ahead for ideas to keep myself creatively busy.

I have begun a list of all the things I hope to accomplish.  I have so many creative interests that it is difficult to quiet my mind and focus on one project at a time.  I do enjoy a good list and love crossing things off my list even more.  One of the first things I would like to accomplish this summer is to take Melissa from ISLY's "I Still Love Calligraphy" 30 day e-course.

photo: ISLY


 I absolutely love how beautiful calligraphy looks.  When I was in middle school, I checked out a calligraphy book from the library and taught myself the basics.  I hope to learn so much more from this class and perhaps be able to offer calligraphy services from home as a part-time job.  If you have a love of Calligraphy, you should definitely check out Melissa's class.

Wednesday, March 14, 2012

Pinterest Challenge: Winter Edition


The Pinterest Challenge was thought up by the wonderful Katie from Bower Power to encourage us to actually make something inspired by something we have pinned on Pinterest.  It could be a craft, a recipe, artwork etc. Anything!  I really enjoy pinning and making wreaths for the different seasons or holidays.  While shopping with a friend recently, she mentioned that she would like a Spring wreath.  She told me she had admired a few with Easter eggs while at Target.  Her birthday is coming up in a couple of weeks so I decided I will make one as a gift.

I pinned this adorable Spring Grapevine Wreath from Martha Stewart last year:


I like the look of the grapevine wreath with the moss but she wants Easter eggs, not woodland creatures. I wandered to the back of my local Michael's craft store and found a grapevine wreath with a little "basket."  So I just stuffed some Spanish moss down into the basket portion of the wreath form and hot glued a few colorful eggs inside.  I also love the look of a flag garland inspired by this wreath from Two Junk Chix:


I cut out flag shapes from pink glitter card stock.  I used a ribbon threading craft punch to make slits to slide my thin pink ribbon through.  Next, I decided where and how I wanted the garland to look before tying it to the back of the wreath.  I added a few "feather" butterflies around the outside of the wreath and topped it off with a coordinating bow.


Please check out the great projects done by and link up your own Pinterest-inspired projects with Katie from Bower Power,  Sherry from Young House Love, Erin from The Great Indoors and Cassie from Hi Sugarplum!

Monday, January 30, 2012

A Pinterest Challenge To Myself...

Pinterest...

I absolutely love that site for all of the creative ideas, pretty inspiration photos, and recipe ideas.  And since I have only 3500 or so ideas pinned, I thought I'd challenge myself to create, sew (well learn to sew), or cook at least one item each month for 2012.  I hope to share at least one project/recipe as I've tried them out.  Anyone care to join me?

So for the month of January, I am in full birthday party planning mode for my daughter.  This year she is turning FIVE!!! on Valentine's Day.  I asked her what she'd like to do for her birthday.  Her response was to "roll a ball."  So a bowling party it is.  I created a birthday party board on Pinterest for bowling party ideas such as invites, party favor bags, and decor.  I used ideas from two invites I found online to create my daughter's invites.

I liked the wording from this invite.  I decided to write it on black card stock I already owned with a white gel pen.


I used my circle cutter to cut out bowling balls from the card stock.  Then I used a hole punch to create the finger holes of the ball and another hole for ribbon.  The other invite I used as inspiration shows a bowling ball covering a pin and connected with a ribbon bow.


I decided not to cut the actual invitation into a bowling pin shape.  It was just easier that way and maybe a little bit lazy.  :)  The bowling ball slides away to reveal all of the important party info.  Taylor's favorite color right now is pink. I choose a hot pink colored font for the invite and used a matching sheer ribbon to tie it all together.  I found pink envelopes at Michaels and finished the invites off with gold inked addresses and heart stickers.  Side note:  The holes on this invite are wonky and this particular invite was not used.


Next on the agenda is designing the party favor bags.  I am working on making Hello Kitty "Thank you for celebrating with me" tags for the bags.  And I know they will have more pink ribbons.  I may even attach a another bowling ball similar to this idea:


I am also going to attempt to make Hello Kitty cupcake toppers using Photoshop and card stock.  I'll include pics after the party.

Wednesday, November 2, 2011

Fall Pinterest Challenge: Thanksgiving Pumpkin Place cards

I am linking up with Young House Love and Bower Power today for Fall edition of the Pinterest Challenge.


My lovely in-law's are hosting our family's Thanksgiving dinner this year.  The food is sure to be delicious and we'll be in the company of family we love and enjoy spending time with.  I wanted to lend a hand in decorating our Thanksgiving table this year by making place cards.  I came across several options while browsing Pinterest and added them to my Let's Talk Turkey board.  For the Fall Pinterest Challenge, I decided on this pin:


The original came from Holly Mathis Interiors.

I made a stop at my local craft store to look for faux mini pumpkins.  But I was out of luck and they were sold out for the season.  I didn't want to buy real pumpkins in fear that they would be rotten by the time Thanksgiving rolls around.  I did find some mini pumpkins made out of dried corn husks and decided to improvise.  After all this is about crafting and making it my own.  I wrote out our guests' names using a gold calligraphy ink pen onto tags and attached them using sisal twine I already had laying around the house.  For the two pumpkins that will sit at the head of the table, I used glittery pumpkins I found in the clearance bin.


This was a quick and simple project.  I hope to add several more projects to our Thanksgiving decor this year.  


Monday, October 31, 2011

Happy Halloween!

Hope you all had as much fun as my little peacock did this Halloween:


Wednesday, October 26, 2011

Pinterest Challenge Fall Edition

  Happy Wednesday!!

Katie and Sherry announced their 2nd Pinterest Challenge today on their blogs. The Fall Edition.  The idea is to recreate one of your pins.  It could be a little or big project.  It could be a fall craft, something for the home, or a delicious treat.  There will be posts next Wed, 11/2/11 on Young House Love and Bower Power to link up your projects and check out what everyone else created.  So get busy!


Here are a few pins I am considering:

I have a couple of faux pumpkins sitting around waiting for me to do something to them.


I'd love to make these pumpkin place cards for our Thanksgiving table:


A simple pumpkin wreath:


These are just a few of the projects I am considering.  What about you?  If you need an invite to Pinterest, leave me a comment or send me an email with the email you'd like to use.

Sunday, September 11, 2011

Halloween Costume Sneak Peek

My 4 year old daughter is going to be a peacock for Halloween.  I decided to make her a tutu skirt and had originally planned to rig a tail made out of real peacock feathers.  I looked around online for ideas but felt that it would be way too fragile for trick or treating.  Then one afternoon I came across a wearable peacock tail from Gymboree's Halloween collection.  Add in the matching tights and it was perfect.  I also ordered a turquoise leotard online.  I still need to figure out how I am going to embellish her headband.


Perfect for dancing and twirling:


Back view:


Skirt detail:


What do you think?  Isn't she the cutest little peacock you've ever seen?


Friday, September 9, 2011

It's The Little Things!

Happy Friday!

Today I am linking up with Lindsay from Aisle to Aloha for a "It's the Little Things!" link up party.  The idea behind the party is simple: to focus on and document the little things from our week that leave us feeling blessed.  No matter how small they may be.


Aisle to Aloha


Saturday, Sept 3rd:  First Gator football game of the year!  The Gators beat FAU 41-3 at their home opener.  My little cheerleader had a blast following along with all the cheering.


Enjoying a beer with my hubby.  Despite what the glass says it was a Kona Longboard Island lager.


Sunday afternoon, we went to the park after a trip to the pet store to play ball with Summer, our Sheltie on her 6th birthday.

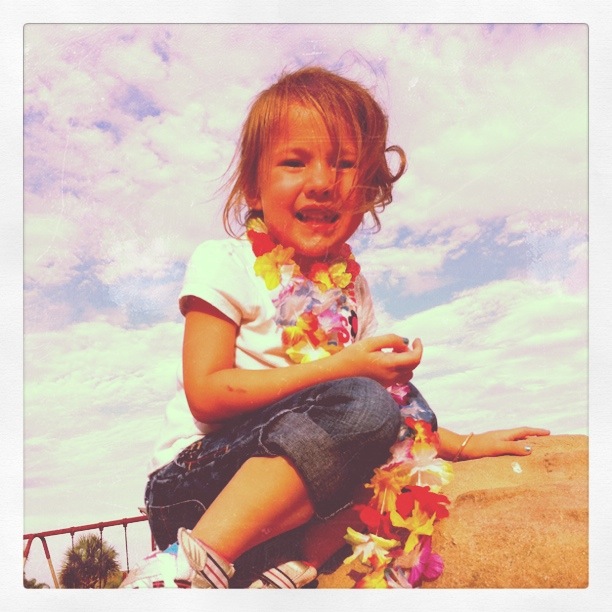
No trip to the park would be complete without some rock climbing and a smile!


Rainbow Roll


Shrimp Tempura roll

Labor Day sushi dinner with friends.


After dinner stroll


Practicing with my brand new dSLR camera!


Puppy lovin'


Watching my little tapper in her classes each week.


Bunny balloon animal @ Kid's Eat Free night!


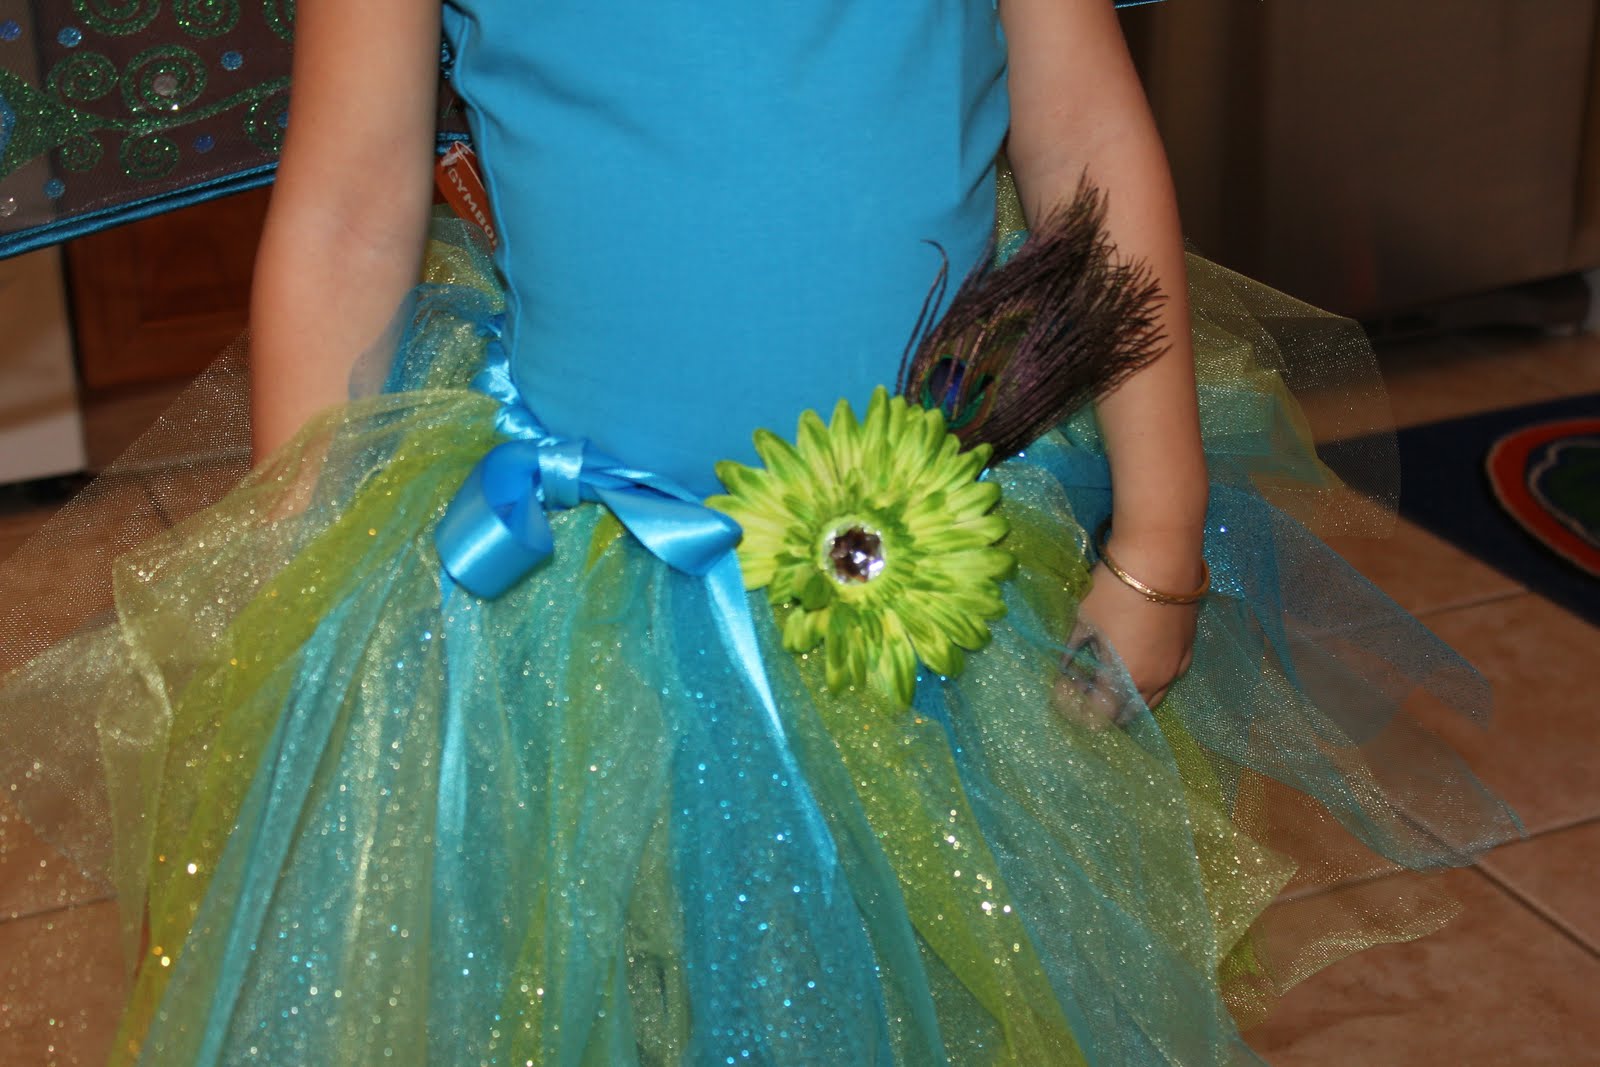
The peacock tutu I am working on for my daughter's Halloween costume.  

These pictures are a mix from my iPhone, Instagram, and my new Canon dSLR camera.  I am brand new to photography so I hope to learn a lot and show improvement.  Any tips or must read tutorials?  We had a nice, lazy Labor Day weekend and I am so looking forward to the upcoming one.  Do you have anything fun going on this weekend?  We will be going to a 30th birthday "treats" party, getting our free Chick-Fil-A breakfast, watching Gator football, and waiting on a new refrigerator to be delivered!

Thanks Lindsay for the link up party!  I'm looking forward to visiting everyone's blogs and learning more about each of you.